How to install Facebook (Meta) Pixel on a WordPress site?
What is Facebook Pixel currently Meta Pixel, and how does it work?
Facebook Pixel is a tracking code that you can use from a Facebook Business account to embed into your site. The data collected with the Facebook pixel can be used in several ways.
This tracking code captures a visitor’s activities on the site’s page. It provides information to improve Facebook and Instagram advertisements to maximise performance.
The Facebook Business Manager conceived the Facebook Pixel. You’ll be able to use Facebook Pixels statistics to show your ad on your website to different audiences. When a new audience is created using Pixel data, it may also help you create similar audiences for new customers.
Facebook Pixel code snippet sends data to your advertising account by placing cookies. It allows you to track web visitors as they interact with the content on your website and Facebook Ads.
What are the benefits of installing Facebook pixel on your WordPress website?
Tracking conversions
The Facebook Pixel shows you the viewer’s actions when clicking an advertisement. Known as conversion, it refers to several things: Thanks to the collected data. You can measure your results and estimate your ROI or ROAS*. If the form aims to get visitors to complete it and you get no conversion rate, it indicates an inadequate form design. In short, the Facebook pixels enable you to analyse your ads and optimise them for your target audience — this is Facebook’s statement.
Retargeting
Is it feasible to advertise to a potential client whose first interest is in a product? It can be achieved through retargeting. You’re targeting the Internet user who has visited your site but has yet to take the necessary action.
You have a fan shop on the internet. Through retargeting, your advertisement will reach a person with an account that has yet to pay but adds fans. You ask them: “Hey, please come back here and give me the details.”
Building similar audiences
Like Facebook, they are called look-alike audiences. Thanks to the information from pixels, you can reach people with the same profiles as their current users. It will give you better targeting for your advertisements and enable you to reach a target audience who’s already been to your site, extending the prospects.
Custom events
A custom event is an event from outside the standard scope of events. It can be an essential step in the sales funnel specific to your website and process. During any stage of the funnel, Pixel events can be triggered. In some cases, the Pixel should fire events for all the steps completed by the questionnaire. For a Facebook Pixels event to be created, You must add the appropriate JavaScript code to your WordPress website.
Custom conversions
How do we make Facebook Pixel conversions for our blog? Tell Facebook how many conversions are valuable. You can also make customisation if your site is accessed through different sites like different product pages.
Custom conversions use URL rules based on specific URL keywords, domains or other parameters. After a few minutes, you can see what their interests are. Learn about WordPress conversion by reading this article.
How to create a Facebook pixel?
Easily manage and track all your advertising on a free website. Facebook Pixel requires you to create Facebook ads for Facebook if you still need one. You may do it via the Facebook Business management dashboard.
Next, contact the Ad Manager. Select the hamburger menu from the menu, then Event Manager. Click on the blue + Connection button. A new window will open asking for names and clicking “Create Pixel”.
How To Install Facebook Pixel on a WordPress site?
We already wrote an article about installing Google Analytics 4 on the WordPress site. The general concept for both tracking codes is the same.
GA4 tracking code and Facebook Pixel are JavaScript snippets that fire specific events and send them to Google or Facebook.
There are several ways of installing Facebook Pixel on the WordPress site. The most popular are:
- Using functional (special) plugins
- Inserting code manually (inserting Facebook Pixel JS snippet)
- Set up using Google Tag Manager, WordPress plugin (GTM4WP) and Facebook Pixel ID.
Install Using Functional (dedicated) Plugins
- Suppose you’re using a plugin like Jetpack or MonsterInsights. In that case, you can easily add the Facebook pixel code directly from their settings page.
- Alternatively, suppose you have access to your website’s source code. In that case, you can manually add the Facebook pixel code in the header section of each webpage that needs tracking.
- You can also use a dedicated Facebook pixel plugin such as Pixel Caffeine or Pixel Catcher to quickly and easily add Facebook pixels to your WordPress site.
There are several dozen WordPress plugins that you can use to deploy FB Pixel. There are a few examples:
- Jetpack plugin
- MonsterInsights
- Pixel Caffeine
- Pixel Catcher
- Facebook for WordPress
- Custom Facebook Pixel
- PixelYourSite
Once the Facebook pixel code is added, you can start tracking conversions and improving your website’s advertising ROI. With facebook pixels installed on your WordPress site, you’ll better understand how people interact with your content and be able to optimise your campaigns for maximum results.
Installing Facebook Pixel using plugins mentioned above may work for inexperienced users, but there are better solutions for many reasons. The most important are:
- These plugins are heavy.
- They are causing database bloat.
- They significantly decrease website security, for example, when social media agencies ask you to have Admin access to your website. When you use Google Tag Manager, they don’t need any access to the website.
- When using these plugins, you are limited to their features. So you can only use some of the features, e.g. can’t modify events, add custom events or event parameters etc.
- It is good to have control over all the tags installed in WordPress, and you can have it with Google Tag Manager (tags GA3, GA4, FB Pixel, Google Ads etc.)
- When you change to a different solution, these plugins will likely leave data in the database.
Inserting code in WordPress manually (inserting Facebook Pixel JS snippet)
You can inject the Facebook Pixel tracking code into each website’s <head>…</head> section. It is JavaScript code that also includes tracking ID.
You can find this code in Go to Business Account in Meta Business Manager. Next, go to Events Manager from your top left menu in Business Manager. You’ll see Events Manager under “Manage Business. Next, select your Pixel under Data Sources and Overview tab. On the right side of the graph, you’ll find the “Manage integrations” button, click it, and here you have access to your Pixel.
Examples where you can deploy this code:
- CMSs
- HTML websites
- Other websites
- Applications
Installing Facebook Pixel on the WordPress website using JavaScript Pixel snippet is to add pixel JS script into the <head>…</head> section.
You can do it using one of the plugins (not recommended) or manually inserting code into the template <head> section. The developer should do this operation, or you can do it yourself if you know how.
This way of installing Facebook Pixel on your website also has limitations. When you decide to extend the scope of events or add custom, you will need editing of the Facebook Pixel JS code.
Install Pixel using Google Tag Manager, WordPress plugin (GTM4WP) and Facebook Pixel ID.
This method doesn’t require any advanced knowledge of WordPress, and there’s no need to know even the basics of coding. It has many advantages and allows you to set up advanced tracking. This installation also will need to install one plugin.
That implementation does not have future limitations and allows, for example, easy installation of EEC events (EEC = enhanced e-commerce) and sending them to the Facebook Ad Manager.
What is needed to start the installation?
- Chrome browser
- Admin access to the WordPress website
- Facebook Pixel tracking ID,
- Google Tag Manager account
- Install the Facebook Chrome extension “Facebook Pixel Helper”, which allows you to check pixel setup, events, and parameters (link here or in the resources at the end of the article)
The process will take about 30 – 60 minutes, depending on your skills and experience.
Additional advice. A good option is to open the following app before setup:
- WordPress dashboard
- Facebook Ads Manager/Events Manager or just saved FB pixel ID
- Google Tag Manager
Open the following browser tabs to allow easy navigation between app windows and copy-paste needed elements between apps.
Step-by-step tutorial on how to install Facebook Pixel in WordPress.
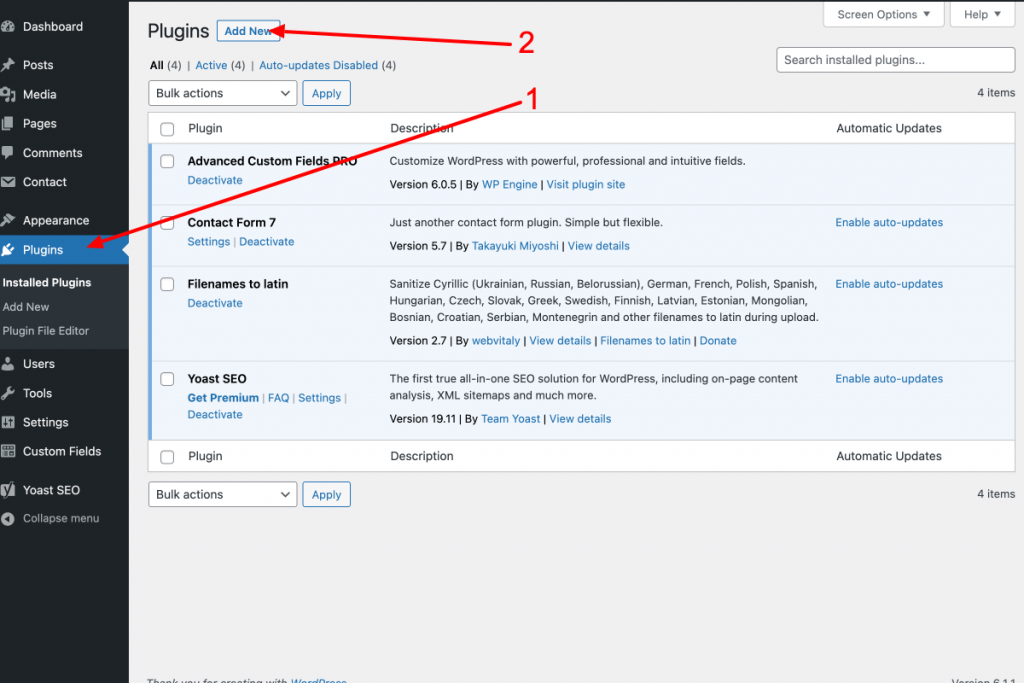
The beginning of the process, GTM4WP installation, is the same for Google Analytics. Go to the WordPress dashboard, click Plugins [1], then click Add New [2].
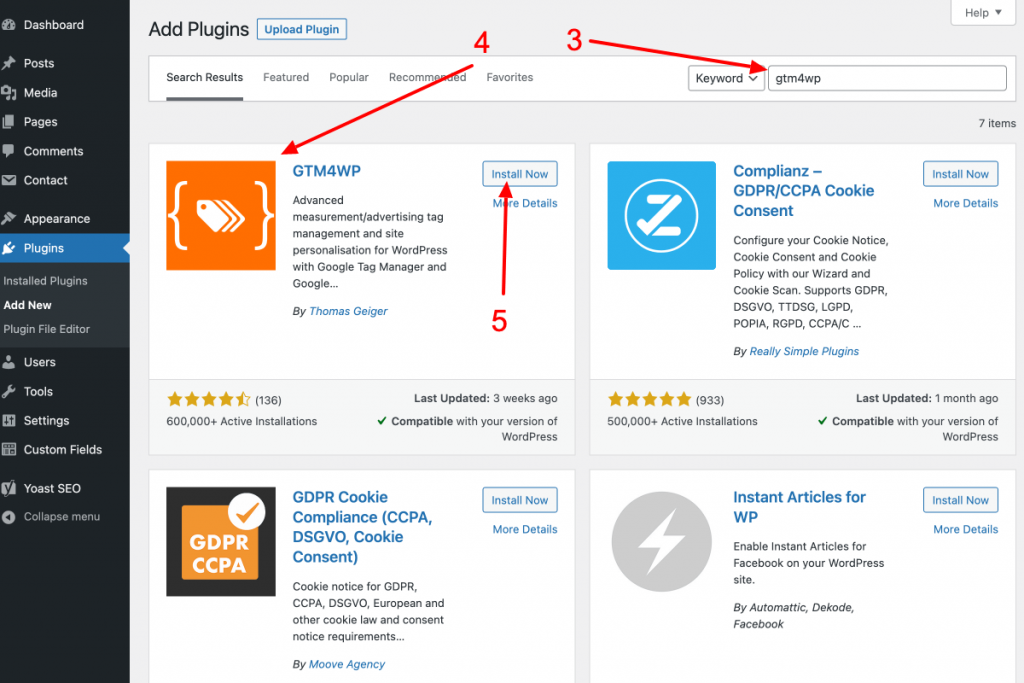
Check if Thomas Geiger is the plugin’s author to ensure the choice. In the search window, type GTM4WP [3]. In the plugin gallery window, find GTM4WP [4] in the plugins gallery, and next click Install Now [5].
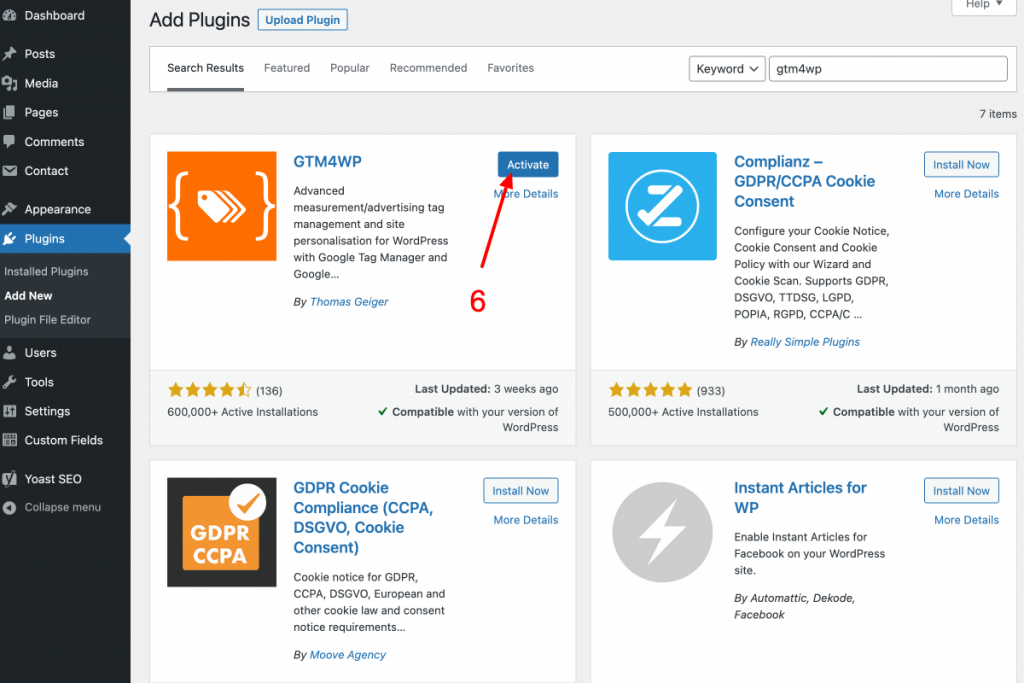
In the WordPress dashboard > Plugins, Click Activate [6]
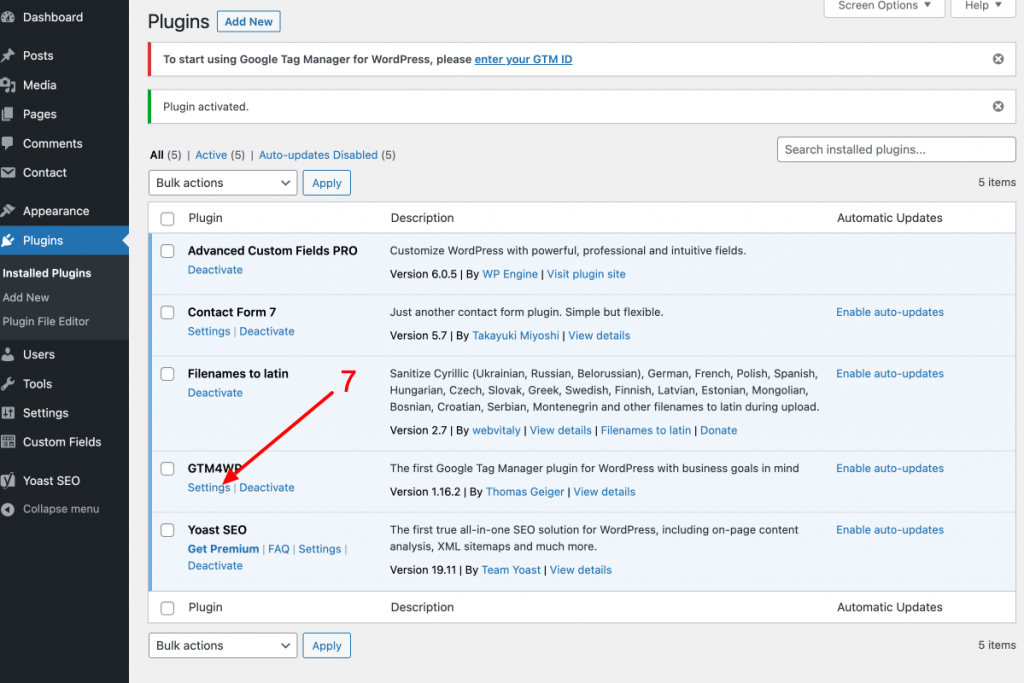
After clicking Activate, the plugin window will open. Click plugin Settings [7]. After clicking the plugin settings window will open (see it in the second following picture).
Next, jump to the Tag Manager account and copy-paste the Google Tag Manager ID [8].
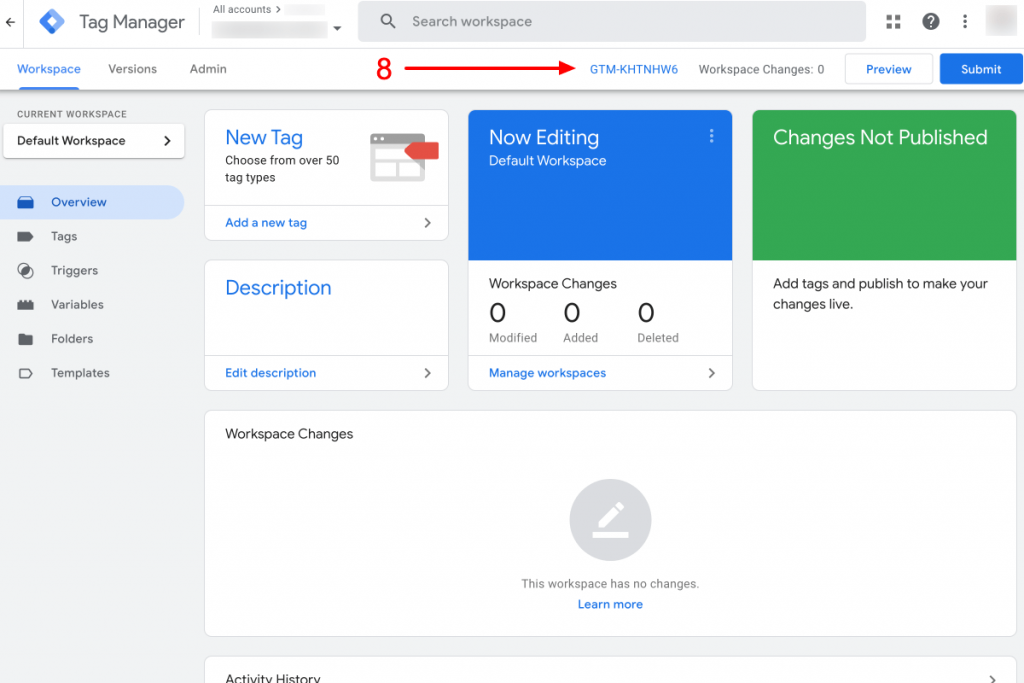
Then copy-paste the Google Tag Manager ID [9] to the GTM4WP plugin settings. In the next step, click Save Changes [10].
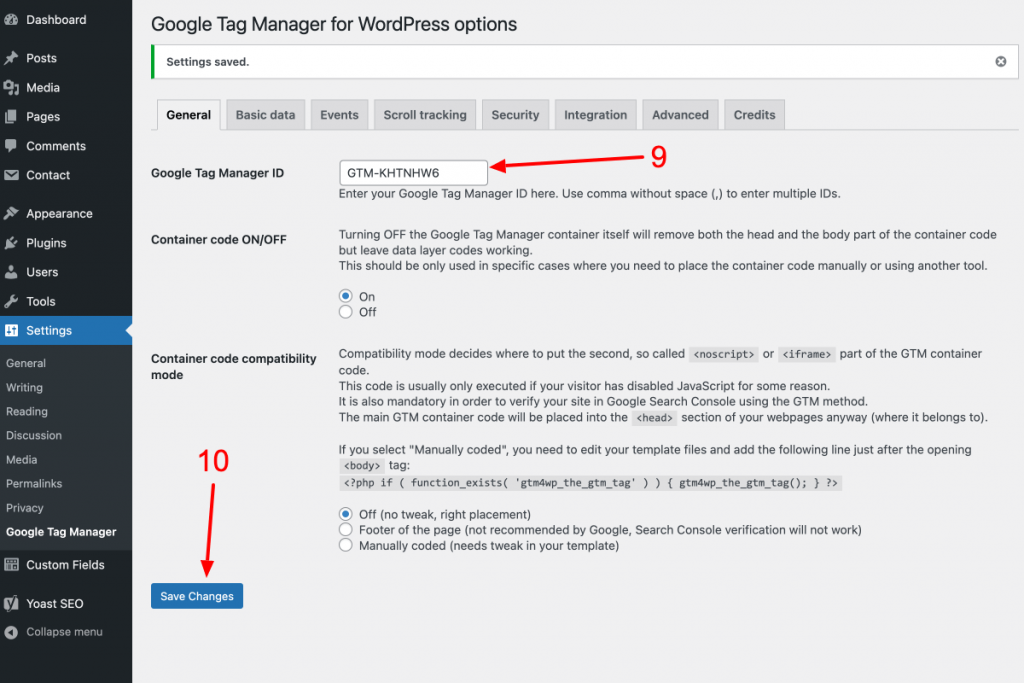
Next, set Container Code OF/OFF [11] radio-check to On and click Save Changes [12] again.

It’s time to change the browser tab and go to Google Tag Manager. In GTM, go to Tags and click New [13]
Google Tag Manager doesn’t have an inbuild Facebook Pixel, but we can use the template from Community Template Gallery. After clicking Choose the tag type to begin setup… [14], next, click Arrow”>” [15] on the bar “Discover more tag types on the Community Template Gallery”.
When Community Template Gallery opens, go to the search window and type “Facebook” [16] to filter the results. Next, choose “Facebook Pixel” by facebook archive tag [17].
Click “Add to workspace” [18], additional window with confirmation will appear, so confirm.
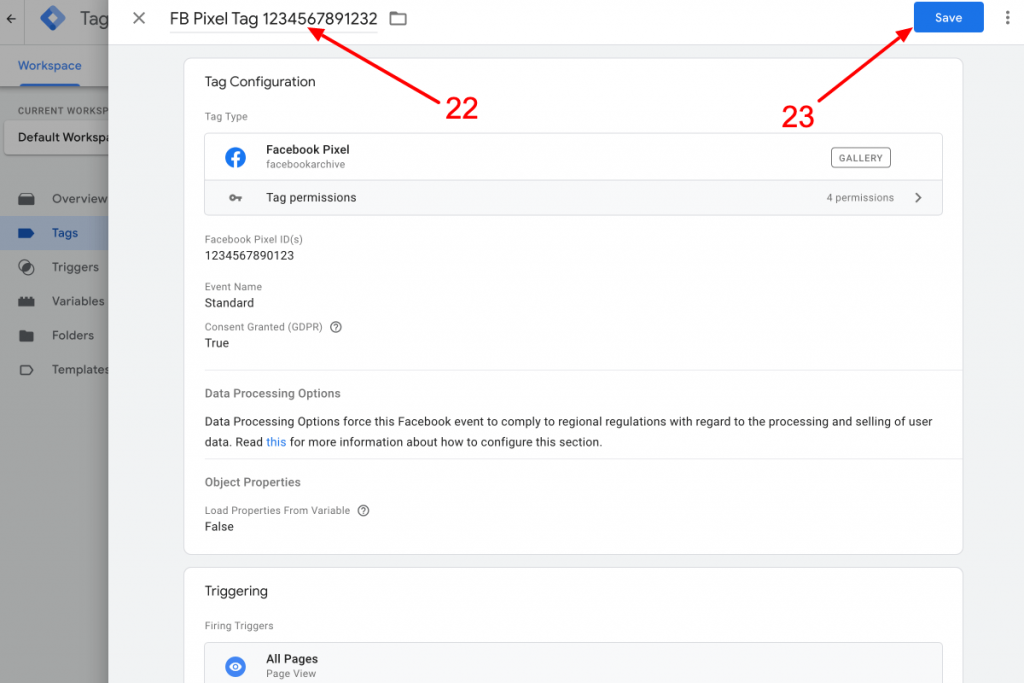
You will add Facebook Pixel ID in this step, so copy and paste it into the Facebook pixel ID field [19]. Next, click triggering [20]
A sliding window will open. Click on the All Pages trigger [21]
Next, give a unique Tag name [22] and click Save [23]
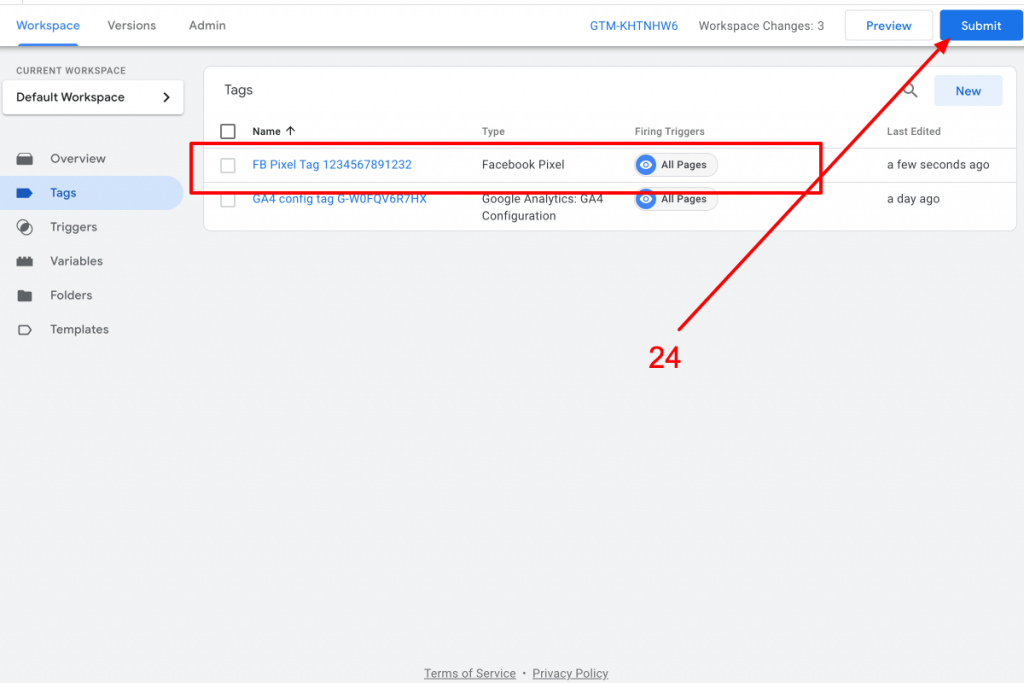
Facebook Pixel Tag is saved, and you need to publish container changes. Click Submit [24]
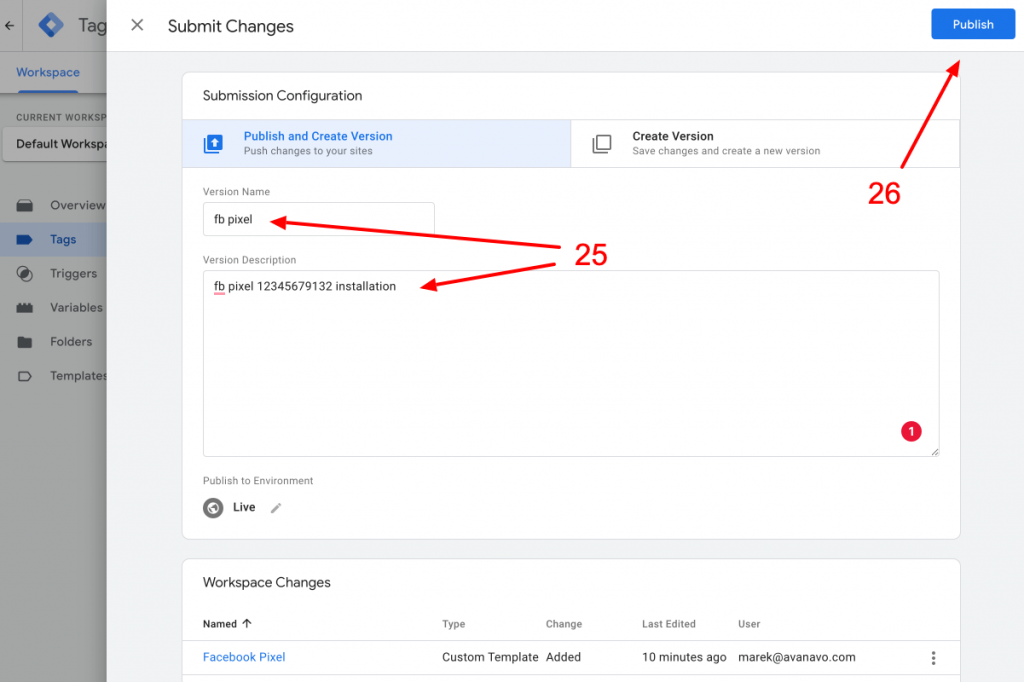
After clicking Submit, provide the Submission name and description [25] and click Publish [26]
The container is published, and you can check Facebook Pixel on WordPress with the Chrome extension, Facebook Pixel Helper (link to download here or in the resources at the end of the article)
Summary
This is the end of basic setup of Facebook Pixel in WordPress using Google Tag Manager. After you add Facebook Pixel to your website, it will help to track conversions and measure the effectiveness of your advertising campaigns. It lets you see how people interact with your website after clicking on your ads. Installing Facebook Pixel on WordPress is a great way to track your website campaigns and measure ROI.
FAQ – Facebook pixel.
No, the Facebook pixel is free. You can set up and install a Facebook pixel. You aren’t obligated to do any advertising with Facebook (this may change in the future).
You can’t install Facebook pixel by yourself on your website. In that case, the only cost is to hire a web developer or digital agency to do it for you.
The maximum time users will stay in a Custom Audience from your website or mobile app is 180 days. After this time, users are removed unless they revisit the website or mobile app.
On Meta help pages, you can find the specifications for Meta pixel standard events.
Following this specification, standard events are – Add payment info, Add to cart, Add to wishlist, Complete registration, Contact, Customise product, Donate, Find location, Initiate checkout, Lead Purchase, Schedule, Search, Start trial, Submit application, Subscribe, View content
Facebook Pixel is still ongoing, but it is important to note that its functionality has changed over the years. As of April 2021, Facebook states that “the pixel is now deprecated and no longer available for use.” Also, The stand-alone Facebook Analytics tool is no longer available as of 1 July 2021. As of February 2022, Facebook Pixel changed its name to Meta Pixel.
However, you can still use it for conversion tracking and other measurements. Instead, Meta recommends that advertisers use their new Conversions API to track events on their website. The Conversions API is more reliable than the Pixel, allowing you to easily track user interactions across different platforms. It includes tracking clicks, page views, checkout steps, leads, form fills, and more.
No, you only need to install Facebook pixel on the pages of your website where you want to track conversions. For most websites, this will be the homepage and any other pages where you run ads or track event goals. But if you want all website visitors sent to Meta Pixel, you must add a Facebook pixel to all pages.